STEP 0 — BIG PICTURE
큰 그림 — 게임기 세팅은 결국 세 가지입니다The big picture — a setup is really three things
- 에뮬레이터 — 게임을 실제로 돌리는 앱 (RetroArch, PPSSPP 같은 것)An emulator — the app that actually runs the game (RetroArch, PPSSPP…)
- 프론트엔드(런처) — 게임을 고르는 화면. 기종별 목록을 보여 주고, 고르면 에뮬레이터를 대신 실행합니다 (ES-DE, Pegasus 같은 것)A front-end (launcher) — the screen where you choose a game. It lists games by system and launches the emulator for you (ES-DE, Pegasus…)
- 메타데이터 + 미디어 — 게임마다 붙는 제목·설명·장르·박스아트·스크린샷·영상. 이게 있어야 2번 화면이 "예쁜 게임기"처럼 보입니다Metadata + media — the title, description, genre, box art, screenshots and video attached to each game. This is what makes the front-end look like a real console
1번과 2번은 앱을 설치하면 끝입니다. 문제는 3번입니다. 파일명이 sf2ce (U) [!].zip 인 롬 수백 개에 제목과 그림을 하나하나 붙이는 건 손으로는 못 할 일이고, 기존 스크래퍼는 한글 파일명을 못 알아보거나 설정이 복잡합니다.Items 1 and 2 are done once the apps are installed. Item 3 is the problem: attaching a title and artwork to hundreds of ROMs named like sf2ce (U) [!].zip is not something you do by hand, and existing scrapers stumble on Korean filenames or bury you in settings.
STEP 1 — WHAT YOU NEED
준비물What you need
- Windows PC — 해방툴은 Windows용입니다A Windows PC — HAE-BANG runs on Windows
- USB 케이블 — 데이터 전송이 되는 것(충전 전용 케이블은 안 됩니다)A USB cable that carries data (charge-only cables won't work)
- 안드로이드 게임기 또는 폰·태블릿 — 리눅스 게임기는 Wi-Fi 나 SD 카드로 하니 7장을 보세요An Android handheld, phone or tablet — Linux handhelds go over Wi-Fi or SD card, see chapter 7
- 롬 파일 — 본인이 소장한 게임에서 뽑은 것. 파일명은 대충이어도 되고, 기종별 폴더로 나눠 두면 편합니다. zip 은 그대로 써도 되고, CD 계열(PS1·새턴·드림캐스트)은 chd 형식을 권합니다 — 용량이 크게 줄고 한 파일이라 관리가 쉽습니다ROM files dumped from games you own. Filenames can be messy, and sorting them into one folder per system helps. Zips are fine as they are; for CD systems (PS1, Saturn, Dreamcast) chd is recommended — far smaller and a single file per game
STEP 2 — DEVICE · RETROARCH
기기 준비 ① — RetroArch 와 코어Device prep ① — RetroArch and cores
RetroArch 는 "에뮬레이터 모음집"입니다. 하나만 깔면 안에서 기종별 코어(기종 하나를 돌리는 부품)를 골라 받을 수 있어서, 8·16비트 기종 대부분은 이걸로 끝납니다.RetroArch is an "emulator bundle": install it once and download a core (the part that runs one system) for each system from inside it. Most 8- and 16-bit systems are covered this way.
설치 — Play 스토어판은 정책 때문에 앱 안에서 코어를 내려받는 기능이 빠져 있습니다. 공식 사이트(retroarch.com)에서 64비트(aarch64) APK를 받아 설치하세요. 요즘 기기는 거의 다 64비트입니다.Install — the Play Store build lacks the in-app core downloader (a store policy). Get the 64-bit (aarch64) APK from the official site (retroarch.com). Almost every current device is 64-bit.
코어 받기 — RetroArch 실행 → Online Updater(온라인 업데이터) → Core Downloader(코어 다운로더). 처음이라면 이 정도면 충분합니다.Get cores — open RetroArch → Online Updater → Core Downloader. For a first setup, this list is enough:
- 패미컴(NES): Nestopia 또는 MesenFamicom / NES: Nestopia or Mesen
- 슈퍼패미컴(SNES): Snes9xSuper Famicom / SNES: Snes9x
- 메가드라이브 · 마스터시스템 · 게임기어: Genesis Plus GXMega Drive · Master System · Game Gear: Genesis Plus GX
- 게임보이 · 컬러 · 어드밴스: mGBA (GB/GBC 는 Gambatte 도 좋음)Game Boy · Color · Advance: mGBA (Gambatte is also good for GB/GBC)
- PC엔진: Beetle PCE FastPC Engine: Beetle PCE Fast
- 네오지오 · 아케이드: FinalBurn Neo (구형 아케이드는 MAME 2003-Plus)Neo Geo · arcade: FinalBurn Neo (MAME 2003-Plus for older arcade boards)
- 닌텐도 64: Mupen64Plus-NextNintendo 64: Mupen64Plus-Next
- 플레이스테이션 1: SwanStation (기기가 약하면 PCSX ReARMed)PlayStation 1: SwanStation (PCSX ReARMed on weaker devices)
- DOS 게임: DOSBox-PureDOS games: DOSBox-Pure
- 드림캐스트: FlycastDreamcast: Flycast
STEP 3 — DEVICE · STANDALONE APPS
기기 준비 ② — 스탠드얼론 앱 몇 개Device prep ② — a few standalone apps
PSP 이후 세대는 RetroArch 코어보다 전용 앱(스탠드얼론)이 훨씬 잘 돕니다. 내 롬에 있는 기종만 골라 깔면 되고, 나중에 추가해도 됩니다.From the PSP generation onward, dedicated (standalone) apps run far better than RetroArch cores. Install only the ones for systems you actually have; you can add more later.
- PSP: PPSSPPPSP: PPSSPP
- 플레이스테이션 1 (고화질로 하고 싶다면): DuckStationPlayStation 1 (for upscaled graphics): DuckStation
- 플레이스테이션 2: NetherSX2 (AetherSX2 후속)PlayStation 2: NetherSX2 (successor to AetherSX2)
- 게임큐브 · Wii: DolphinGameCube · Wii: Dolphin
- 닌텐도 DS: melonDSNintendo DS: melonDS
- PS Vita: Vita3KPS Vita: Vita3K
STEP 4 — DEVICE · FRONT-END
기기 준비 ③ — 프론트엔드(게임 고르는 화면)Device prep ③ — a front-end (the game picker)
- ES-DE (EmulationStation Desktop Edition) — 가장 무난하고 예쁜 선택. 안드로이드판은 소액 유료입니다. 이 페이지는 ES-DE 기준으로 설명합니다.ES-DE (EmulationStation Desktop Edition) — the safe, good-looking choice. The Android build is a small one-time purchase. This page assumes ES-DE.
- Pegasus — 무료. 해방툴이 Pegasus 형식도 그대로 만들어 줍니다.Pegasus — free. HAE-BANG writes the Pegasus format too.
- HB런처 — 함께 개발 중인 3D 케이스 런처(케이스를 진열장에서 꺼내 열고 카트리지를 꽂는 연출). v0.7 출시를 앞두고 있으며, 해방툴(공개 버전 포함)의 [HB런처] 내보내기로 버튼 하나에 바로 전송됩니다.HB Launcher — our own 3D-case launcher (take a case off the shelf, open it, slot the cartridge). v0.7 is about to launch, and HAE-BANG (public version included) sends to it with one button via [HB Launcher] export.
ES-DE 를 처음 실행하면 "롬 폴더가 어디냐"고 묻습니다. 기기 내부 저장소의 ROMs 폴더(없으면 만들면 됩니다)나 SD 카드의 롬 폴더를 지정해 두세요. 해방툴이 이 경로를 자동으로 읽어 갑니다.On first launch ES-DE asks where your ROM folder is. Point it at a ROMs folder on internal storage (create one if needed) or on the SD card. HAE-BANG reads this path automatically later.
STEP 5 — DEVICE · USB DEBUGGING
기기 준비 ④ — USB 디버깅 켜기 (1분)Device prep ④ — turn on USB debugging (one minute)
해방툴이 USB 로 기기에 파일을 넣으려면 이게 필요합니다.HAE-BANG needs this to write files to the device over USB.
- 설정 → 휴대전화 정보(태블릿 정보 / 기기 정보) → 빌드 번호를 7번 연타 → "개발자가 되었습니다"Settings → About phone (tablet / device) → tap Build number seven times → "You are now a developer"
- 설정 → 개발자 옵션 → USB 디버깅 켜기Settings → Developer options → USB debugging on
- PC 에 USB 로 꽂으면 기기에 "USB 디버깅을 허용하시겠습니까?" 창이 뜹니다 → 허용 ("이 컴퓨터에서 항상 허용"에 체크하면 다음부터 묻지 않습니다)Plug into the PC and the device shows "Allow USB debugging?" → Allow (tick "Always allow from this computer" to skip it next time)
STEP 6 — HAE-BANG
해방툴 — 여기서부터가 본론입니다HAE-BANG — this is the main event
설치 — 다운로드에서 Windows용 설치 파일을 받아 설치합니다. 공개 버전 v1.1 은 무료입니다.Install — grab the Windows installer from the download page. The public v1.1 is free.
① 롬 폴더 읽히기 (자동 매칭)① Read the ROM folder (auto-match)
- 왼쪽 위 [+ 시스템] → 로컬(롬 파일)Top-left [+ System] → Local (ROM files)
- 기종(예: 메가드라이브)을 고르고, 그 기종의 롬 폴더를 지정 → 추가Pick the system (e.g. Mega Drive), choose its ROM folder → Add
- 자동 매칭이 돌고, 이어서 이미지·영상·설명서를 내려받습니다. 수백 개도 수십 초에서 몇 분이면 끝납니다.Matching runs, then images, video and manuals download. Hundreds of games take seconds to a few minutes.
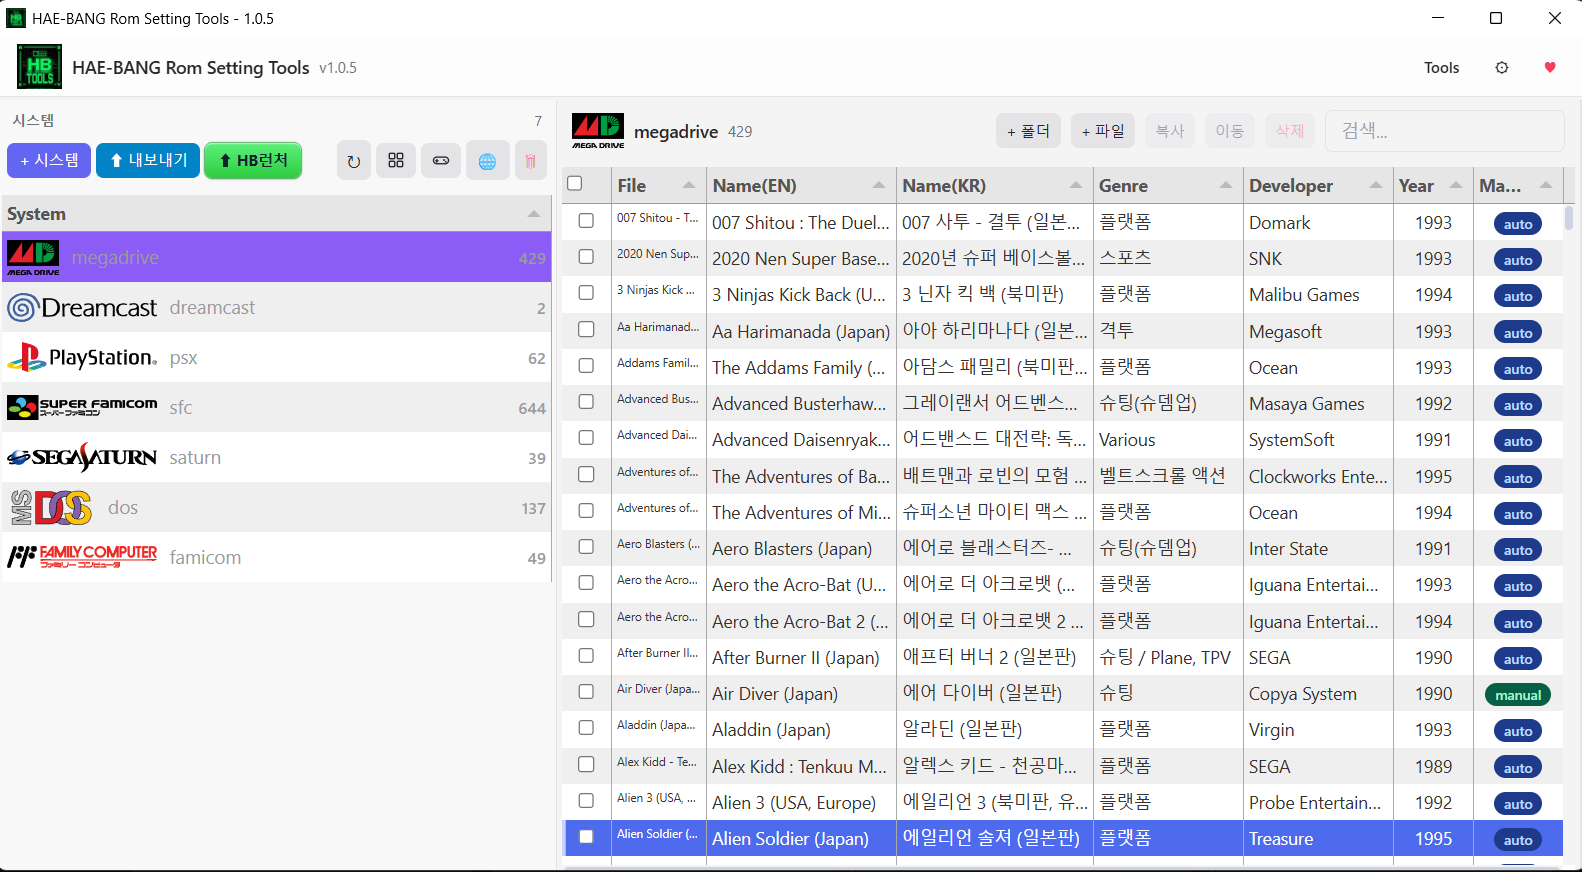
끝나면 목록에 한글 제목 · 영문 제목 · 장르 · 개발사 · 연도가 채워지고, 게임을 누르면 오른쪽에 박스아트·스크린샷·휠 로고·케이스·영상·설명서가 뜹니다. 파일명이 한글이어도, 오타가 있어도 대부분 알아봅니다. 기종이 여러 개면 같은 과정을 반복하면 됩니다 — 기종마다 1분 남짓입니다.When it finishes, the list shows Korean and English titles, genre, developer and year; select a game and box art, screenshots, wheel logo, case, video and manual appear on the right. Korean filenames and typos are recognized most of the time. Repeat for each system — about a minute each.
② 애매한 것만 손보기② Fix only the doubtful ones
목록 맨 오른쪽 "매칭 방식" 열에 게임마다 배지가 붙습니다 — auto(파일명으로 자동 확정), llm(AI 가 후보 중에서 판정), manual(직접 지정), 못 찾은 것은 빈 배지. 미매칭이거나 제목이 이상해 보이는 게임만 우클릭 → 메타 편집에서 후보 목록을 보고 맞는 걸 고르면 됩니다(리전도 고를 수 있습니다). 마스터 DB 에 없는 게임은 ScreenScraper 계정으로 바로 조회하거나 AI 로 채울 수도 있는데, 처음엔 몰라도 됩니다.The "Matching" column on the far right tags each game — auto (settled from the filename), llm (AI chose among candidates), manual (set by you), and blank for unmatched. Only for unmatched games or odd-looking titles, right-click → Edit metadata and pick the right candidate (you can choose the region too). Games missing from the master DB can be looked up with a ScreenScraper account or filled by AI — not something you need on day one.
③ (선택) 기종별로 어떤 에뮬레이터로 돌릴지 지정③ (Optional) choose which emulator runs each system
기본은 RetroArch 코어입니다. PSP 를 PPSSPP 로, PS1 을 DuckStation 으로 돌리고 싶으면 시스템 목록 위의 프론트엔드 설정(격자 아이콘) → ES-DE 탭 → 빌드 OS 를 Android 로 → 기종별 대체 에뮬레이터를 고르면, 그 설정이 목록에 함께 실려 나갑니다. 3장에서 깔아 둔 앱과 맞춰 주면 됩니다.The default is RetroArch cores. To run PSP on PPSSPP or PS1 on DuckStation, open Front-end settings (grid icon) above the system list → ES-DE tab → build OS: Android → pick an alternative emulator per system; that choice travels with the list. Match it to the apps you installed in chapter 3.
④ 기기로 내보내기 (USB 한 번)④ Export to the device (one USB pass)
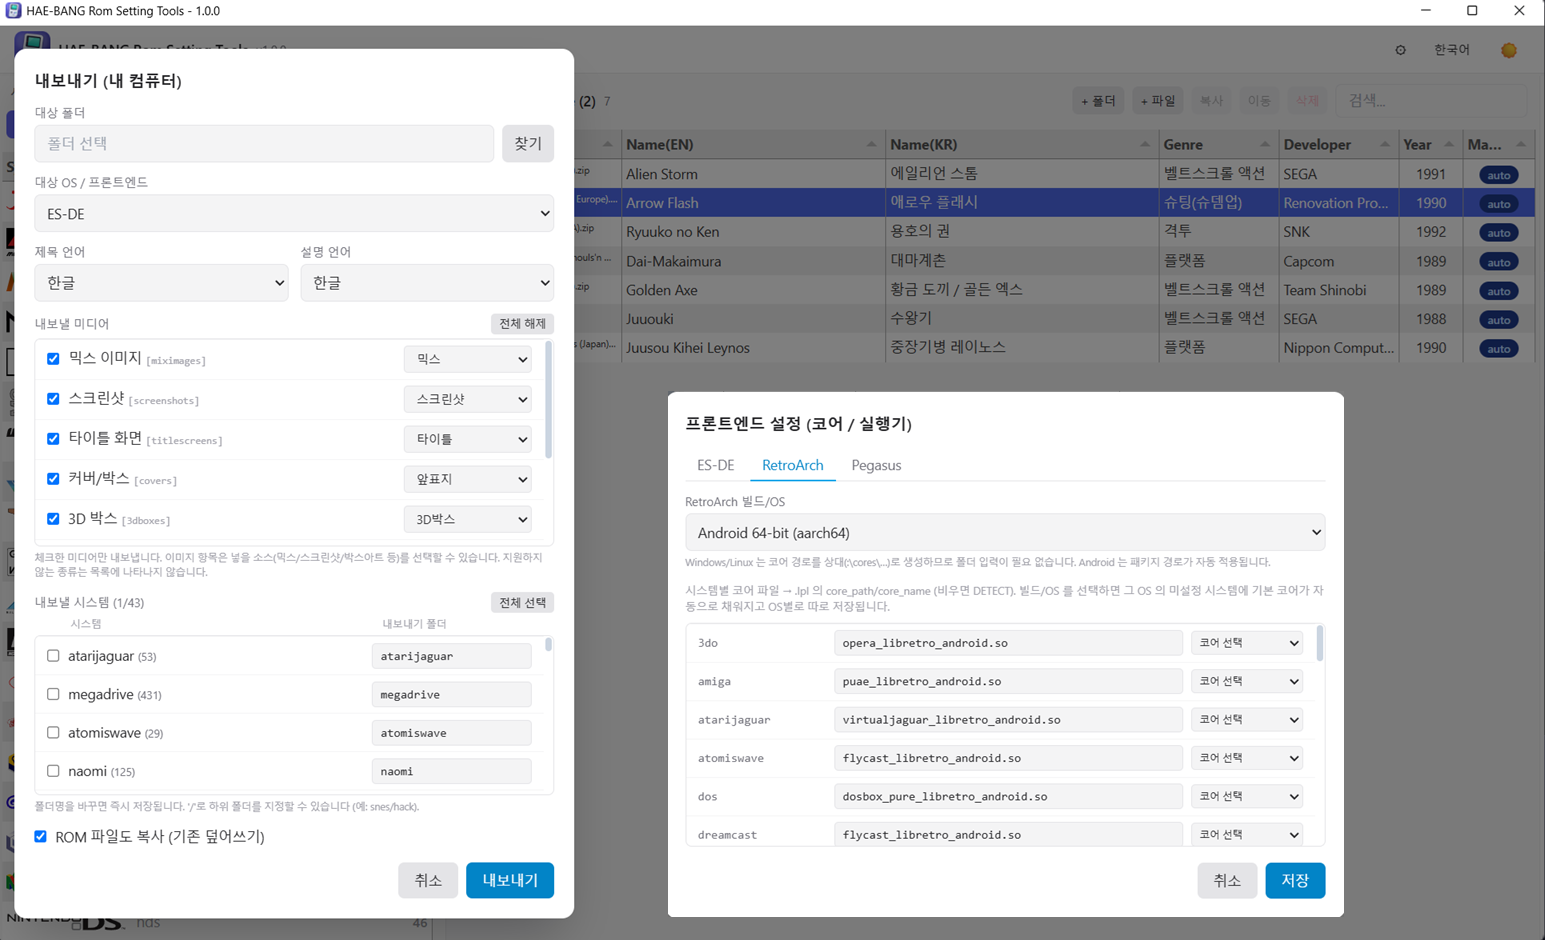
- [⬆ 내보내기] → 대상: 안드로이드(ADB) → [기기 연결] → "연결됨: 기기명"이 뜨는지 확인[⬆ Export] → destination: Android (ADB) → [Connect device] → confirm "Connected: device name"
- 프론트엔드: ES-DE (Pegasus 사용자는 Pegasus)Front-end: ES-DE (or Pegasus if that's what you use)
- 롬 경로(기기)는 ES-DE 설정을 읽어 자동으로 채워집니다. 확인만 하세요.The device ROM path is filled in automatically from ES-DE's settings — just check it.
- 게임 목록 처리는 병합(기본) — 기기에 이미 있던 목록·즐겨찾기는 건드리지 않습니다.Game list handling: Merge (default) — existing lists and favourites on the device are left alone.
- ROM 파일도 복사 체크 — 롬을 아직 기기에 안 넣었다면 이걸로 같이 보냅니다. 이미 있는 파일은 건너뛰어서 두 번째부터는 빠릅니다.Tick Copy ROM files too if the ROMs aren't on the device yet. Files already there are skipped, so repeat exports are fast.
- 보낼 기종을 체크하고 내보내기Tick the systems to send and press Export
큰 롬은 진행률이 용량 단위로 보이고, 도중에 취소도 됩니다. 실패한 파일이 있으면 몇 개가 왜 안 갔는지 알려 주고, 다시 내보내면 그것만 재전송합니다.Large ROMs show byte-level progress and can be cancelled. If any file fails, you're told how many and why, and re-exporting resends only those.
⑤ 기기에서 확인⑤ Check on the device
ES-DE 를 실행(또는 목록 새로고침)하면 끝입니다. 기종별로 박스아트가 깔린 목록, 한글 제목과 설명, 스크린샷·영상이 붙은 게임기가 되어 있습니다. 여기까지가 "앱 몇 개 + 롬 + 해방툴"로 되는 일입니다.Launch ES-DE (or refresh its list) and you're done: lists lined with box art per system, Korean titles and descriptions, screenshots and video attached. That is what "a few apps + ROMs + HAE-BANG" gets you.
STEP 7 — LINUX HANDHELDS
리눅스 게임기(ArkOS · OnionOS · muOS · KNULLI · ROCKNIX · Batocera)는?Linux handhelds (ArkOS · OnionOS · muOS · KNULLI · ROCKNIX · Batocera)?
과정은 같고 내보내기 대상만 다릅니다.Same process — only the export destination changes.
- Wi-Fi 로 보내기 — 내보내기 → 대상: 커스텀 리눅스(SFTP) → 기기 OS 를 고르면 계정·비밀번호·롬 경로 기본값이 자동으로 들어갑니다. IP 만 넣고 연결.Over Wi-Fi — Export → destination: Custom Linux (SFTP) → pick the device OS and the account, password and ROM path defaults fill in. Enter the IP and connect.
- SD 카드로 직접 — 내보내기 → 대상: 내 컴퓨터 → SD 카드 드라이브를 지정. 리더기에 꽂아 쓰는 방식입니다.Straight to the SD card — Export → destination: My Computer → choose the card's drive in a reader.
OS 마다 폴더 이름·목록 파일 규칙이 다른데(gamelist.xml, miyoogamelist.xml, 이미지 폴더 위치 등) 해방툴이 고른 OS 에 맞춰 알아서 맞춥니다.Each OS has its own folder names and list files (gamelist.xml, miyoogamelist.xml, image folder locations…); HAE-BANG adapts to whichever OS you chose.
STEP 8 — NEXT
익숙해지면 써 볼 것들Once you're comfortable
- 컨트롤러 키설정 — 기종별·게임별 패드 배치를 만들어 내보내기 때 함께 보냅니다(RetroArch 리맵, DOS 패드 설정, Dolphin 프로필). → 문서 6장Controller mapping — per-system and per-game pad layouts exported alongside the games (RetroArch remaps, DOS pad maps, Dolphin profiles). → Guide ch. 6
- 한글화 패치 적용 — 게임 우클릭 → 패치 적용. IPS · BPS · UPS · PPF · APS · Xdelta 를 툴 안에서 바로 입힙니다. → 문서 2장Translation patches — right-click a game → Patch ROM. IPS, BPS, UPS, PPF, APS and Xdelta applied in place. → Guide ch. 2
- 설명서 AI 번역 — 게임 설명서(PDF)를 보면서 현재 페이지를 한글로 번역해 덮어 볼 수 있습니다. → 문서 3장AI manual translation — read the manual (PDF) with the current page translated as an overlay. → Guide ch. 3
- 3D 박스 · 믹스 이미지 — 앞표지만 있는 게임도 실제 케이스 비율의 3D 박스를 만들고, 박스+스크린샷+로고를 한 장으로 합칩니다. → 문서 4장3D boxes · mix images — build true-proportion 3D boxes from a cover and compose box, screenshot and logo into one showcase image. → Guide ch. 4
- 기존 라이브러리 가져오기 — 이미 ES-DE 나 Pegasus 로 세팅해 둔 게 있으면 그대로 읽어 들입니다. → 문서 10장Import an existing library — already set up in ES-DE or Pegasus? Read it in as-is. → Guide ch. 10
- 게임저장(세이브) 공유 — v1.0.5 부터 쓸 수 있습니다. PC·기기의 에뮬레이터 세이브를 알아보고 한곳에 모았다가 다른 기기로 옮깁니다. → 문서 12장Game save sharing — available from v1.0.5: identify emulator saves on PC and devices, gather them and move them to another device. → Guide ch. 12
STEP 9 — TROUBLESHOOTING
자주 막히는 곳Where people get stuck
- 기기 연결이 안 돼요 — 케이블 꽂은 채 USB 디버깅 끄고 켜기 → 기기에 뜨는 허용 창 확인 → 충전 전용 케이블이 아닌지 확인 → PC 에 ADB 드라이버가 없다면 해방툴이 띄우는 드라이버 설치 방법을 따르기(v1.0.10).The device won't connect — toggle USB debugging with the cable in → accept the prompt on the device → make sure it isn't a charge-only cable → if the PC has no ADB driver, follow the How to install the driver guide the tool shows (v1.0.10).
- ES-DE 에 게임이 안 보여요 — ES-DE 가 보는 롬 폴더와 해방툴의 "롬 경로(기기)"가 같은지 확인하세요. 대부분 이 경로 차이입니다.Games don't show in ES-DE — check that ES-DE's ROM folder and HAE-BANG's "ROM path (device)" are the same. That mismatch is the usual cause.
- 게임을 골랐는데 RetroArch 만 뜨고 안 돌아요 — 그 기종 코어가 안 깔린 겁니다(2장). 스토어판 RetroArch 라면 코어를 못 받는 게 원인일 수 있습니다.RetroArch opens but the game doesn't run — the core for that system isn't installed (chapter 2). On the Play Store build, the missing core downloader is often the reason.
- 매칭이 이상하게 됐어요 — 우클릭 → 메타 편집에서 후보를 바꾸면 됩니다. 폴더에 여러 기종 롬이 섞여 있으면 기종별로 나눠 넣는 게 정확도가 좋습니다.A match is wrong — right-click → Edit metadata and pick another candidate. If several systems share one folder, splitting them per system improves accuracy.
- 공개 버전과 베타 차이 — 공개 v1.1 은 누구나 무료로 받을 수 있고, 새 기능은 후원자 베타에 먼저 들어갑니다(현재 v1.1.3). 공개판에서는 일부 민감한 시스템이 빠져 있으며, 베타 버전 및 PRO 버전에서만 전체 시스템을 사용할 수 있습니다.Public vs. beta — public v1.1 is free for everyone; new features land in the sponsor beta first (v1.1.3 now). The public build leaves out some sensitive systems; the full set of systems is available only in the beta and PRO editions.
SUMMARY
다섯 줄 요약In five lines
- 기기: RetroArch(+코어) · 프론트엔드 · 필요한 스탠드얼론 앱 설치Device: install RetroArch (+cores), a front-end, and the standalone apps you need
- USB 디버깅 켜기Turn on USB debugging
- PC: 해방툴에 롬 폴더 읽히기 → 애매한 것만 손보기PC: read the ROM folder into HAE-BANG → fix only the doubtful matches
- [⬆ 내보내기] → 안드로이드(ADB) → ES-DE → 내보내기[⬆ Export] → Android (ADB) → ES-DE → Export
- 기기에서 ES-DE 켜면 끝Open ES-DE on the device — done
한 번만 해 보면, 다음부터는 롬 폴더에 게임을 더 넣고 내보내기만 누르는 일이 됩니다. 기능 하나하나의 자세한 설명은 문서(사용 가이드)에 있습니다.Do it once and from then on it's just adding games to the folder and pressing Export. Every feature is explained in detail in the docs (user guide).