READING · 레트로 에뮬레이터 이야기Retro Emulator Story

막막한 에뮬레이터 세계,
왜 이렇게 생겼을까?
The overwhelming world of emulators —
why is it built this way?

에뮬레이터·레트로아크·프론트엔드·세팅… 용어부터 숨이 막히는 분들을 위해, "사용법"이 아니라 "왜 이렇게 됐는지"를 추억과 함께 풀어 봅니다. For anyone who finds the very terms — emulator, RetroArch, front-end, setup — suffocating, here's not a how-to, but the "why," told with a little nostalgia.

초보자 · 추억 보유자 · 레트로 뉴비를 위한 이해 중심 가이드 An understanding-first guide for beginners, the nostalgic, and retro newbies

PART 1 — 게임팩에서 만능게임기까지

에뮬레이터 세계에 처음 발을 들이면 대부분 시작이 막막합니다. 에뮬레이터는 뭐고, 레트로아크는 뭐고, 프론트엔드에 세팅까지… "뭐가 이리 복잡해!" 라는 말이 절로 나오는 게 당연합니다. 그러다 보니 그냥 누군가 다 만들어 둔 것을 받아 쓰는 경우도 많죠.

세상에는 사용법 위주의 글이 많습니다. 그래서 저는 조금 다르게, "왜 이런 프로그램들이 생겼는지" 이해의 폭을 넓혀 보자는 마음으로 이 글을 씁니다. 어릴 때부터 컴퓨터와 게임을 좋아한 분들 중에는 저처럼 에뮬레이터의 발전사와 함께 게임을 즐겨 온 분도 많을 겁니다. ZSNES, NESticle을 아신다면… 네, 고인물 인증입니다. 이 글은 이제 막 레트로 에뮬 세계에 발을 들인 분들, 옛 게임기의 추억이 있는 분들, 레트로 게임을 좋아하는 뉴비를 위해 최대한 쉽게 적었습니다.

그러니 초보자의 시선에서, 제 옛 행적(?)과 함께 끄적인 이 이야기를 찬찬히 즐기며 읽어 주시면 좋겠습니다.

"게임을 한다"는 것 — 그때와 지금

우리가 흔히 말하는 "게임을 한다"를, 옛날 게임기를 쓰던 시절로 돌아가 떠올려 봅시다. 그리고 그것을 에뮬레이터 세계의 "게임을 한다"와 나란히 비교해 보겠습니다.

🕹️ 옛날 게임기 시절

  1. 부모님을 조르고 졸라, 용산에서 호구도 맞아 가며 겨우 게임팩을 산다.
  2. 소중한 게임팩을 조심스레 게임기에 삽입한다.
  3. 전원을 올려 밤새 게임하다 부모님께 뒤통수를 맞는다.

💾 에뮬레이터 세계

  1. 게임팩을 사는 대신 게임 롬 파일을 얻는다.
  2. 게임기 역할을 하는 에뮬레이터에서 롬 파일을 LOAD한다.
  3. 밤새 게임하다 와이프님께 등짝 스매싱을 맞는다.

상당히 비슷하죠? 결국 "팩 → 롬 파일", "게임기 → 에뮬레이터"로 바뀌었을 뿐, 본질은 같습니다.

게임기를 흉내 낸 프로그램, 에뮬레이터

어릴 적, 게임기 한 대 갖기도 쉽지 않던 시절 아버지가 패미컴과 슈퍼마리오를 사 주셨을 때가 생각납니다. 자랑하고 싶어 마리오 팩을 들고 친구 집 MSX에 짓이겨 넣었죠. 네… 그땐 참 무식했습니다. 너무 세게 누른 나머지 팩 안 기판이 케이스 속으로 쏙 들어가 버렸고, 얼마나 울었는지 모릅니다. ㅠ

패미컴 팩이 패미컴(과 호환 기종)에서만 돌아가듯, 에뮬레이터도 "어떤 게임기를 흉내 냈는가"에 따라 돌릴 수 있는 롬이 정해집니다.

패미컴을 흉내 낸 에뮬레이터에는 패미컴 롬을, MSX를 흉내 낸 에뮬레이터에는 MSX 롬을 넣어 즐기는 식이죠. 실제 게임기 없이 롬 파일을 로드해 즐길 수 있게 된 겁니다. 한마디로 에뮬레이터는 게임기를 흉내 낸 프로그램입니다.

저 역시 안드로이드 폰이 막 나오던 초창기, 레트로 게임을 돌리려고 MD.emu, NES.emu 같은 에뮬을 기종별로 따로 받아 각 기종에 맞는 게임을 즐기곤 했습니다. 지금도 이렇게 심플하게 게임 라이프를 즐기는 분들이 있을 겁니다.

책상 위에 쌓여 가는 게임기들

이런 개별 에뮬레이터들은 계속 발전해 왔고, 다양한 기종을 즐기고 싶던 저는 결국 온갖 에뮬레이터를 다 깔게 됩니다. PC 바탕화면과 폰 화면에는 잡다한 에뮬 아이콘이 가득 펼쳐졌죠. 마치 방 안에…

패미컴, 겜보이, 슈퍼겜보이 with 메가CD + 32X, 슈퍼패미콤, PC엔진, 네오지오… 온갖 게임기가 늘어져 전원선은 꼬이고, 게임 패드는 제각각 굴러다니는 그 모양새 말입니다. 😵‍💫

물론 깔끔하게 정리하는 분도 있겠지만(저는 절대 아니었습니다)… 어릴 때 한 번쯤 이런 상상 해 보셨을 겁니다. 만능 게임기 한 대에 모든 게임기의 CPU를 이식해서, 하나로 모든 기종을 돌릴 수 있다면 얼마나 끝내줄까? 팩 모양이 제각각이니 팩 꽂는 입구를 여러 개 만들어 볼 수도 있겠죠.

만능 게임기의 탄생 — 레트로아크

실제로 그런 기기는 나올 수 없었지만, 바로 이 컨셉으로 개발된 프로그램이 있습니다. 그것이 레트로아크(RetroArch)입니다. 다양한 게임기 CPU(코어)를 레트로아크에 집어넣으면, 우리는 레트로아크라는 하나의 프로그램으로 여러 기종을 구동할 수 있게 됩니다.

레트로아크의 [코어 다운로드]가 바로 이런저런 게임기의 CPU를 집어넣는 행위이고, 그래서 레트로아크를 쓰는 데 필수적인 과정이죠. 사실 레트로아크는 기존 독립 에뮬레이터들의 코어를 살짝 다듬어 품은 것이라, 많은 사람들이 함께 만든 프로그램이라고도 볼 수 있습니다.

덕분에 우리는 레트로아크에서 직접 게임을 골라 구동할 수 있고, 마치 하나의 만능 게임기처럼 게임패드 설정이나 화면 설정이 다른 기종에도 똑같이 적용됩니다. 한 번 내 손에 맞춘 세팅으로 모든 기종을 편하게 즐길 수 있게 되는 것이죠.

"프론트엔드"라는 말

"프론트엔드"라는 말, 가끔 들어 보셨을 겁니다. 프론트엔드(Front-End)의 사전적 의미는 사용자가 실제로 보고 상호작용하는 부분을 뜻합니다. 레트로 게임에서 쓰는 프론트엔드도 비슷한데, 보통 여러 게임기와 게임을 직접 고르고 구동할 수 있으면서 미려한 테마를 제공하는 프로그램을 가리킵니다.

그런 의미에서 레트로아크는 다양한 코어를 실행하는 프로그램이면서, 동시에 게임을 직접 골라 구동하는 프론트엔드 역할까지 합니다. 다만… 그리 미려하지는 않다는 게 좀 문제죠. 😅

게임은 돌아가는데… 뭔가 허전하다

자, 이제 만능 게임기가 생겼고 각종 게임팩을 대표하는 롬도 잘 챙겼습니다. 레트로아크에서 롬을 로드하고 어떤 코어로 돌릴지 설정하면, 하나의 프로그램으로 게임이 돌아갑니다. 어떤 팩이든 만능 게임기의 알맞은 트레이에 넣고 스위치를 올리면 되는 것과 같은 이치죠.

이것만으로 게임 구동에는 큰 문제가 없습니다. 그런데 뭔가 좀 심심합니다. 상상해 보죠. 나뒹굴던 게임기와 꼬인 선들은 만능 게임기 한 대로 대체됐고, 게임들은 알팩 상태로 바구니에 기종별로 담겨 있습니다.

그림도 흐릿한 알팩들. 어떤 게임인지 구분이 안 돼 싸인펜으로 겉면에 이름을 적고, 그 이름만 보고 게임을 골라 플레이합니다.— 결국 늘 하던 게임, 아는 게임만 하게 되죠.

용산 게임샵의 두근거림

우리가 어릴 적 잘 꾸며진 용산 게임샵을 보면 왜 그렇게 가슴이 두근거렸을까요? 화려한 케이스로 정갈하게 진열된 게임들, 앞면의 멋진 캐릭터 작화, 뒷면의 실제 게임 화면, 그리고 매장에서 시연 중인 플레이 화면까지… 거기엔 분명한 쾌감이 있었습니다.

자, 이제 바구니 속 알팩을 멋진 정품 케이스에 담고, 예쁜 장식장에 진열해 봅시다. 장식장 옆엔 모니터를 두어 게임 구동 화면까지 흐르게 하면… 두근거리는 나만의 게임 공간이 탄생합니다.

그래서, "세팅"

바로 여기에서 세팅이라는 말이 나옵니다. 물론 앞서 말한 코어 다운로드, 롬 준비, 게임패드 설정도 세팅이라 할 수 있습니다. 하지만 이런 초기 세팅엔 시간이 그리 많이 들지 않습니다.

진짜 고역은 따로 있습니다. 게임 롬 파일과, 그에 대응하는 이미지·설명 정보를 일일이 잘 매핑하는 작업이죠. 알팩 하나하나를 맞는 케이스에 포장하고 매뉴얼까지 넣는 일과 같아서, 상당한 시간과 노력이 듭니다.

레트로아크도 나름 스크린샷·박스커버를 보여 주는 기능은 있지만… 뭔가 예쁘진 않죠? 그래서 등장하는 것들이 바로 ES-DE, 다이지쇼(Daijishō), 페가수스(Pegasus) 같은, 흔히 프론트엔드라 부르는 다양한 프로그램들입니다.

▶ TO BE CONTINUED…

다음 편에 계속

예쁜 프론트엔드들, 그리고 그 미려함의 핵심인 메타데이터·미디어 세팅 이야기로 이어집니다.

PART 1 — From Cartridges to the All-in-One Console

When you first step into the world of emulators, the start usually feels overwhelming. What's an emulator? What's RetroArch? Front-ends, setup… "Why is this so complicated!" is a perfectly natural reaction. So a lot of people just grab whatever someone else has already set up.

There are plenty of how-to guides out there. So I wanted to do something a little different — to widen your understanding of "why these programs came to exist." Among those who've loved computers and games since childhood, many have grown up alongside the history of emulators, just like me. If you know ZSNES and NESticle… yes, that's veteran certification. This piece is written as simply as possible for newcomers to retro emulation, those with fond memories of old consoles, and retro-game-loving newbies.

So, from a beginner's point of view, here's my little story — scribbled together with my own past escapades. Please enjoy it at a relaxed pace.

"Playing a game" — then and now

Let's recall what we casually call "playing a game," back in the days of old consoles. Then let's line it up against "playing a game" in the world of emulators.

🕹️ The old console days

  1. Beg your parents endlessly, get fleeced at the electronics market, and finally buy a game cartridge.
  2. Carefully insert the precious cartridge into the console.
  3. Power on, play all night, and get smacked on the back of the head by your parents.

💾 The emulator world

  1. Instead of buying a cartridge, you obtain a game ROM file.
  2. You LOAD the ROM in an emulator that plays the role of the console.
  3. Play all night and get a back-slap from your spouse.

Pretty similar, right? In the end, only "cartridge → ROM file" and "console → emulator" changed; the essence is the same.

Emulators — programs that imitate consoles

I remember when, in an era when owning even one console wasn't easy, my dad bought me a Famicom and Super Mario. Dying to show off, I carried the Mario cartridge to a friend's house and jammed it into his MSX. Yeah… I was clueless back then. I pushed so hard that the board inside slid right out of its plastic shell. I can't tell you how much I cried. ㅠ

Just as a Famicom cartridge only runs on a Famicom (and compatible machines), an emulator can only run the ROMs of whatever console it imitates.

An emulator imitating a Famicom takes Famicom ROMs; one imitating an MSX takes MSX ROMs. Now you can load and enjoy ROM files without the actual console. In short, an emulator is a program that imitates a console.

In the early days of Android phones, I too downloaded separate emulators like MD.emu and NES.emu for each system to play. Some people still enjoy their gaming life this simply today.

Consoles piling up on the desk

These individual emulators kept improving, and wanting to play many systems, I ended up installing every emulator under the sun. My PC desktop and phone screen filled up with a clutter of emulator icons. Like a room with…

Famicom, Game Boy, Super Game Boy with Mega CD + 32X, Super Famicom, PC Engine, Neo Geo… every console sprawled out, power cables tangled, gamepads rolling around all over. 😵‍💫

Sure, some people keep it all tidy (I absolutely did not)… but haven't you, at least once as a kid, imagined this? What if one all-in-one console had every console's CPU transplanted into it, so a single machine could run every system? How awesome would that be? Since cartridge shapes differ, maybe you'd even build several cartridge slots.

The all-in-one console is born — RetroArch

Such a device could never really exist — but a program built on exactly this concept does. It's RetroArch. By putting various console CPUs (cores) into RetroArch, we can run many systems with a single program called RetroArch.

RetroArch's [Core Download] is precisely the act of inserting this or that console's CPU — so it's an essential step in using RetroArch. In fact, RetroArch took the cores of existing standalone emulators and refined them in, so you could call it a program built by many people together.

Thanks to this, we can pick and run games right inside RetroArch, and like a single all-in-one console, gamepad and display settings apply identically across systems. Tune it once to your liking, and you can comfortably enjoy every system with that one setup.

The word "Front-End"

You've probably heard the word "front-end" now and then. The dictionary meaning of Front-End is the part the user actually sees and interacts with. The front-end in retro gaming is similar — generally a program that lets you directly pick and launch various systems and games, with a beautiful theme.

In that sense, RetroArch is both a program that runs various cores and one that performs the front-end role of picking and launching games directly. The catch is… it's just not that pretty. 😅

The games run… but something's missing

Now we have our all-in-one console, and we've gathered the ROMs that represent each cartridge. In RetroArch you load a ROM, choose which core to run it with, and the game runs from a single program — just like dropping any cartridge into the right tray of an all-in-one console and flipping the switch.

This alone is enough to run games. But something feels a little dull. Picture it: the sprawling consoles and tangled cables are now one all-in-one console, and the games sit as bare cartridges in baskets sorted by system.

Bare cartridges with faded labels. You can't tell which is which, so you scribble names on them with a marker and pick games by name alone.— In the end, you only ever play the same old games you already know.

The thrill of the game shop

Why did our hearts race as kids at a beautifully arranged game shop? The games neatly displayed in flashy cases, the gorgeous character art on the front, the actual gameplay shots on the back, and the demos playing nearby… there was a real thrill there.

So now, let's put those bare cartridges into nice official cases and display them in a pretty cabinet. Add a monitor beside it streaming gameplay, and… your very own heart-racing game space is born.

And so — "setup"

This is exactly where the word "setup" comes in. Of course, the core downloads, ROM prep, and gamepad config mentioned earlier are also setup. But that initial setup doesn't take much time.

The real grind is elsewhere. It's the work of carefully mapping each ROM file to its matching images and descriptive info. It's like packing each cartridge into its proper case and slipping in the manual too — it takes considerable time and effort.

RetroArch does have features to show screenshots and box covers… but it's just not pretty, is it? That's why programs like ES-DE, Daijishō, and Pegasus — the various programs commonly called front-ends — come into play.

▶ TO BE CONTINUED…

Continues next time

The pretty front-ends, and the heart of that beauty — metadata & media setup — are up next.

PART 2 — 프론트엔드와 레트로아크

1부를 짧게 요약하면 이렇습니다. 우리는 만능게임기(레트로아크)로 여러 종류의 게임팩(게임 롬)을 구동할 수 있다 — 각종 게임기의 CPU(코어)를 탑재하고 있으니까. 잘만 쓰면 엄청난 종류의 게임이 돌아간다! 그런데… 뭔가 허전합니다. 게임샵에서 고르듯 다양한 정보와 근사한 화면이 나오면 좋겠죠. 그래서 등장한 것이 프론트엔드였습니다. 자, 이제 프론트엔드를 좀 더 들여다봅시다.

프론트엔드의 핵심

에뮬레이터 게임을 구동하는 프론트엔드의 핵심은 이렇습니다 — 내가 가진 게임들의 자세한 정보, 다양한 이미지·영상, 미려한 게임 선택 화면, 그리고 구경하다 바로 실행하는 편리함.

바구니에 알팩을 넣어두고 이름만 봐가며 고를 것이냐 — 아니면 화려한 선반에 진열된 케이스 그림을 감상하고, 게임 화면·영상도 구경하며 "오 이건 재밌겠네!" 기대하며 들어갈 것이냐.— 이 차이가 바로 프론트엔드입니다.

프론트엔드가 하는 일

프론트엔드는 다양한 게임기와 게임을 멋지게 보여주면서, 게임 롬(게임팩)을 에뮬레이터(게임기)로 실행시켜 줍니다. 대표적인 범용 프론트엔드로 요즘 가장 각광받는 것이 ES-DE입니다. 윈도우·안드로이드·리눅스·맥·스팀덱 등 다양한 OS를 지원해서, 윈도우에서 꾸민 나만의 멋진 장식장을 안드로이드 게임기로 그대로 이전할 수도 있죠. 같은 프론트엔드를 여러 기기에서 쓰니 무척 편합니다. 그리고 1부에서 말했듯 레트로아크도 넓게 보면 이런 프론트엔드에 속합니다.

프론트엔드는 "게임기"가 아니다

프론트엔드는 그 자체로 게임기를 흉내 내는 프로그램이 아닙니다. 에뮬레이터를 실행시켜 주는 동시에, 내 게임 목록을 미려하게 보여주는 것이 목적이죠. 그래서 프론트엔드만 있으면, 게임 롬이 있어도 게임을 못 돌립니다. 게임팩을 사서 예쁜 진열장에만 놓았을 뿐, 정작 게임기는 없는 상황인 거죠.

프론트엔드는 바로가기 아이콘을 보여주는 "바탕화면" 같은 녀석입니다. 여튼, 안내자 역할이죠.
그래서 프론트엔드 설정에는 반드시 "각 게임 기종을 어떤 에뮬레이터로 실행할지" 정하는 부분이 있습니다. 예: 슈퍼패미콤 게임은 SNES9X로 실행해줘! 이게 초기 세팅의 핵심이죠. 보통 프론트엔드마다 기본값이 잡혀 있기도 합니다. 그리고 범용 프론트엔드(ES-DE, 다이지쇼, 페가수스…)는 독립 에뮬레이터(ppsspp, pcsx2 등)가 있으면 그걸 연동해 롬을 구동시킵니다. 그런데… 레트로아크는 여기서 살짝 다릅니다. (아.. 또 왜이래!!! 😵)

레트로아크는 좀 다르다

레트로아크는 다양한 독립 에뮬레이터 역할을 하는 [코어]를 품고 있다고 했습니다. 그래서 레트로아크 그 자체로는 게임을 실행할 능력이 없습니다. 실제로 게임을 에뮬레이트하는 건 바로 이 코어(Core)라는 개별 모듈이죠(독립 에뮬레이터 프로그램은 아닙니다). 결국 레트로아크는 코어로 게임을 돌릴 뿐, 다른 독립 에뮬레이터를 실행시키지는 못합니다. 이게 범용 프론트엔드와 레트로아크의 큰 차이입니다.

코어 — 클릭 한 번으로 게임기를 사다니

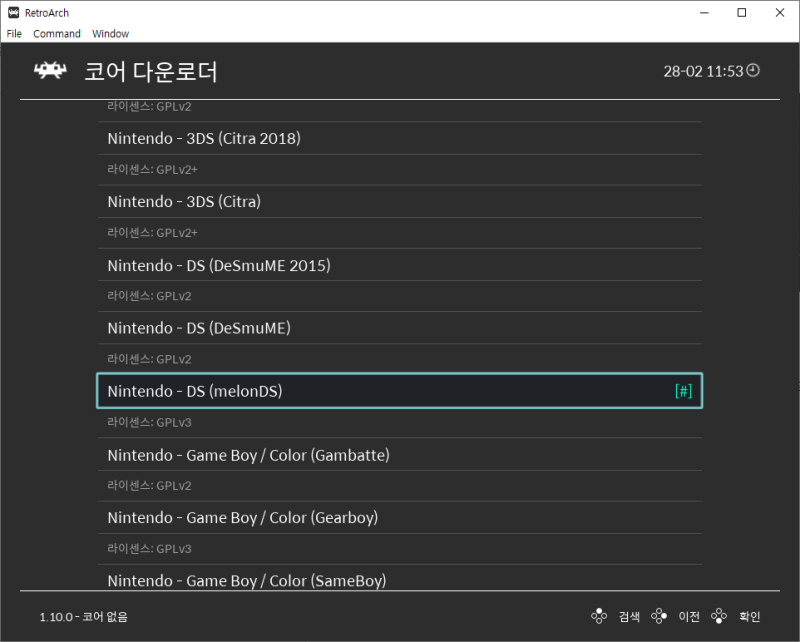
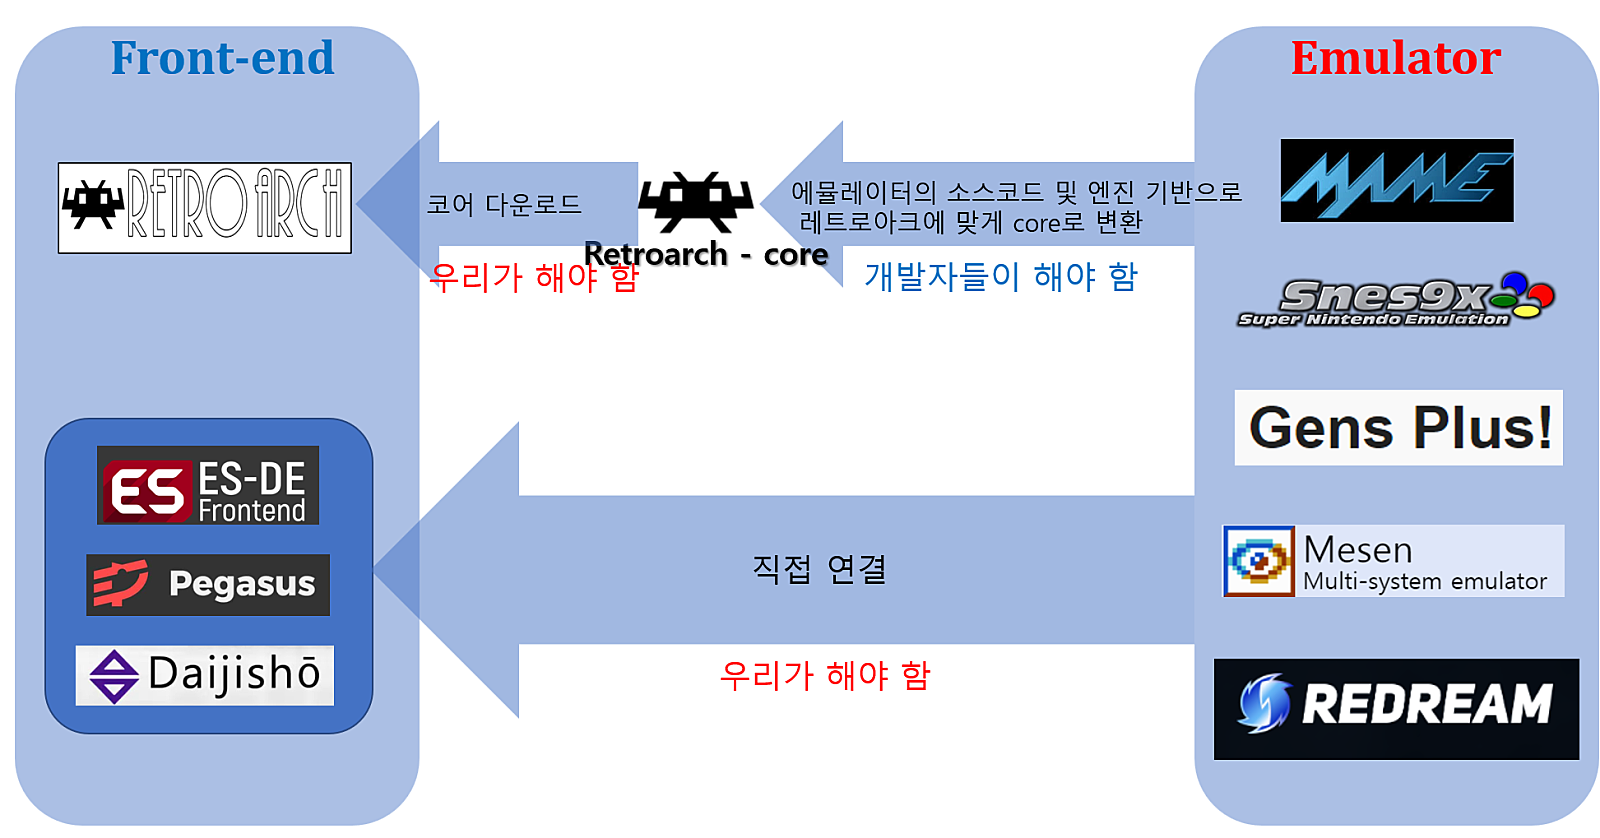
이 [코어]는 기존 에뮬레이터의 소스코드·엔진을 기반으로, 개발자들이 레트로아크용으로 다시 포팅(변환·개발)한 것입니다. 우리는 그저 레트로아크에서 클릭 한 번으로 다운로드+설치를 하면 되죠. (이 얼마나 좋은 세상인가… 클릭 한 번으로 게임기를 사다니!!! 🛒)

레트로아크 코어 다운로더 레트로아크 코어 다운로더 — 클릭 한 번으로 게임기 CPU(코어)를 설치

한 번 설정하면, 모든 기종에 그대로

레트로아크는 코어로 모든 게임을 돌리면서, 단순 연동을 넘어 쉐이더, 게임패드 버튼 설정, 비디오 렌더러, 오디오 드라이버, 세이브/로드, 화면 번역 같은 기능을 한 번만 설정하면 모든 코어에 공통 적용되는 어마어마한 장점이 있습니다.

반대로 독립 에뮬레이터를 여러 개 쓴다면? 게임 종료 버튼 조작이 슈퍼패미콤 따로, 메가드라이브 따로… 결국 "게임 제대로 끄는 법"마저 에뮬마다 외워야 하는 불편이 생깁니다. 😩

그래서 레트로아크는 "통합 에뮬레이터"처럼

이렇다 보니 레트로아크는 미려한 테마로 목록을 보여주는 일반 프론트엔드와 달리, 통합 에뮬레이터에 가까운 성격을 띱니다. 그래서 범용 프론트엔드는 독립 에뮬레이터와 연결하는 것은 물론, 레트로아크 자체를 "프론트엔드가 아니라 하나의 에뮬레이터"처럼 취급해 연결합니다.

프론트엔드와 에뮬레이터 연결 관계 프론트엔드 ↔ 에뮬레이터 — 코어 다운로드/직접 연결은 우리가, 코어 포팅은 개발자가

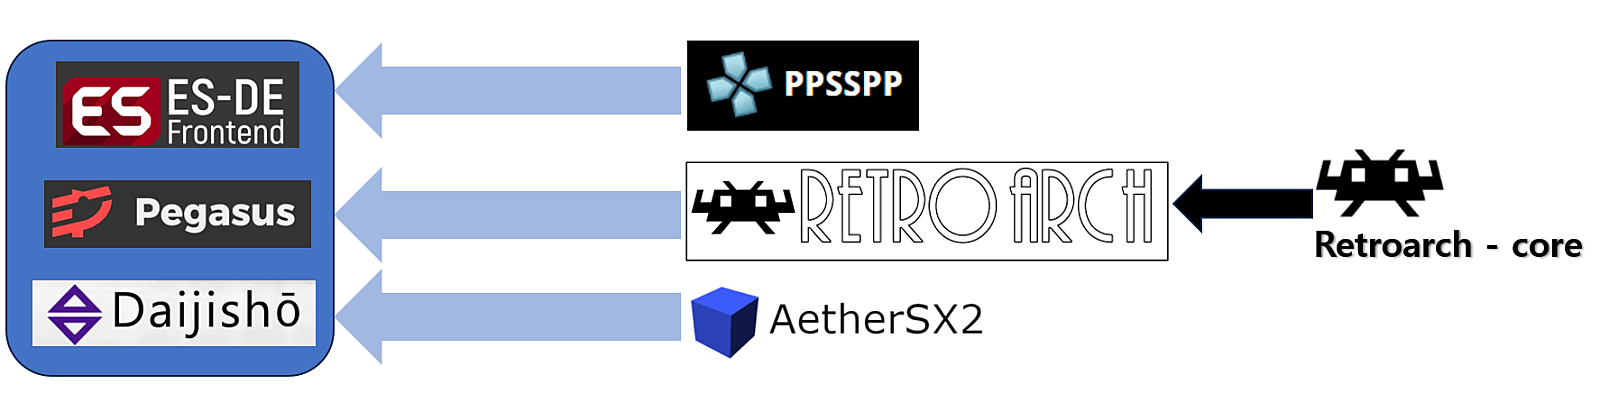
특히 레트로아크는 워낙 많은 에뮬레이터(코어)를 품고 있어서, 거의 모든 프론트엔드의 디폴트 에뮬레이터로 레트로아크 기반 코어가 쓰이고 있습니다.

프론트엔드가 레트로아크를 에뮬레이터처럼 연결 범용 프론트엔드는 레트로아크(코어)를 하나의 에뮬레이터처럼 연결해 사용
▶ TO BE CONTINUED…

다음 편에 계속

이제 실제로 손에 쥐는 휴대용 게임기 — SoC와 OS의 세계로 들어갑니다.

PART 2 — Front-Ends and RetroArch

A quick recap of Part 1: with our all-in-one console (RetroArch) we can run many kinds of cartridges (ROMs) — because it carries each console's CPU (core). Used well, a staggering number of games will run! But… something felt missing. We wished for rich info and a gorgeous screen, like picking a game at a shop. That's what brought us the front-end. So let's look at front-ends a bit more closely.

The heart of a front-end

The heart of a front-end for emulator games is this — detailed info about the games you own, plenty of images and video, a beautiful selection screen, and the convenience of launching right as you browse.

Will you keep cartridges in a basket and pick by name alone — or admire the art on cases displayed on a gorgeous shelf, check out gameplay shots and videos, and dive in thinking "ooh, this looks fun!"?— That difference is exactly what a front-end is.

What a front-end does

A front-end shows off various systems and games beautifully while launching the ROM (cartridge) on an emulator (console). The leading general-purpose front-end getting the most attention these days is ES-DE. It supports Windows, Android, Linux, Mac, Steam Deck and more, so you can carry the beautiful cabinet you set up on Windows straight over to an Android handheld. Using the same front-end across many devices is wonderfully convenient. And as mentioned in Part 1, RetroArch broadly belongs to this front-end category too.

A front-end is NOT a "console"

A front-end is not itself a program that imitates a console. Its purpose is to launch an emulator while beautifully presenting your game library. So with only a front-end, you can't run a game even if you have the ROM. You bought the cartridges and put them in a pretty display case — but you don't actually have the console.

A front-end is like a "desktop" that shows shortcut icons. In short, it's a guide.
That's why a front-end's settings always include the part where you decide which emulator runs each system. For example: run Super Famicom games with SNES9X! This is the heart of initial setup. Usually each front-end ships with defaults, too. And general front-ends (ES-DE, Daijishō, Pegasus…) will link to standalone emulators (ppsspp, pcsx2, etc.) if you have them, to run the ROMs. But… RetroArch is a little different here. (Argh, what now!!! 😵)

RetroArch is a bit different

We said RetroArch holds [cores] that act as various standalone emulators. So RetroArch by itself has no ability to run a game. What actually emulates the game is this individual module called a Core (not a standalone emulator program). In the end RetroArch runs ROMs using its cores, and cannot launch other standalone emulators. That's the big difference from general front-ends.

Cores — buying a console with one click

This [core] is something developers re-ported (converted and developed) for RetroArch, based on the source code or engine of an existing emulator. We just download + install it with a single click inside RetroArch. (What a wonderful world… buying a console with one click!!! 🛒)

RetroArch Core Downloader RetroArch's Core Downloader — install a console's CPU (core) with one click

Set it once, and it applies to every system

RetroArch runs all games via cores, and beyond mere linking it offers shaders, gamepad button config, video renderer, audio driver, save/load, screen translation and more — with the huge advantage that setting it once applies across all cores.

Use several standalone emulators instead, and? The quit-game button is one thing on Super Famicom, another on Mega Drive… eventually you have to memorize even "how to properly quit the game" separately for every emulator. 😩

So RetroArch acts like a "unified emulator"

Because of this, unlike a typical front-end focused on showing your list with pretty themes, RetroArch takes on the character of a unified emulator. So general front-ends not only link to standalone emulators, but also treat RetroArch itself as "a single emulator, not a front-end" and connect to it that way.

Front-end and emulator relationship Front-end ↔ Emulator — core download / direct linking is on us; porting the cores is on the developers

In particular, since RetroArch holds so many emulators (cores), RetroArch-based cores are used as the default emulator of almost every front-end.

Front-ends connect to RetroArch like an emulator General front-ends connect to RetroArch (cores) as if it were a single emulator
▶ TO BE CONTINUED…

Continues next time

Now we step into the world of the actual devices in your hands — handhelds: SoC and OS.

PART 3 — 게임기·SoC·OS 고르기

2부까지 읽으셨다면 프론트엔드와 에뮬레이터, 그리고 그 사이에 낀 듯한 레트로아크를 개략적으로 이해하셨을 겁니다. 이제 우리가 직접 손에 쥐는 휴대용 게임기와, 그 안의 SoC(시스템 온 칩 — CPU·GPU 등이 하나의 칩에), 그리고 OS까지 묶어서 보면 핸드헬드 에뮬 세계가 한층 또렷해집니다.

복잡한가요? ㅋㅋ 하지만 그리 어렵지 않습니다. 간단한 예로, 여러분이 PC를 사서 PSP 에뮬 PPSSPP를 깔았다고 합시다. 그러면 — Machine = PC, SoC = Intel/AMD, OS = Windows, 프론트엔드 = 없음, Emulator = PPSSPP 를 쓰고 계신 겁니다.

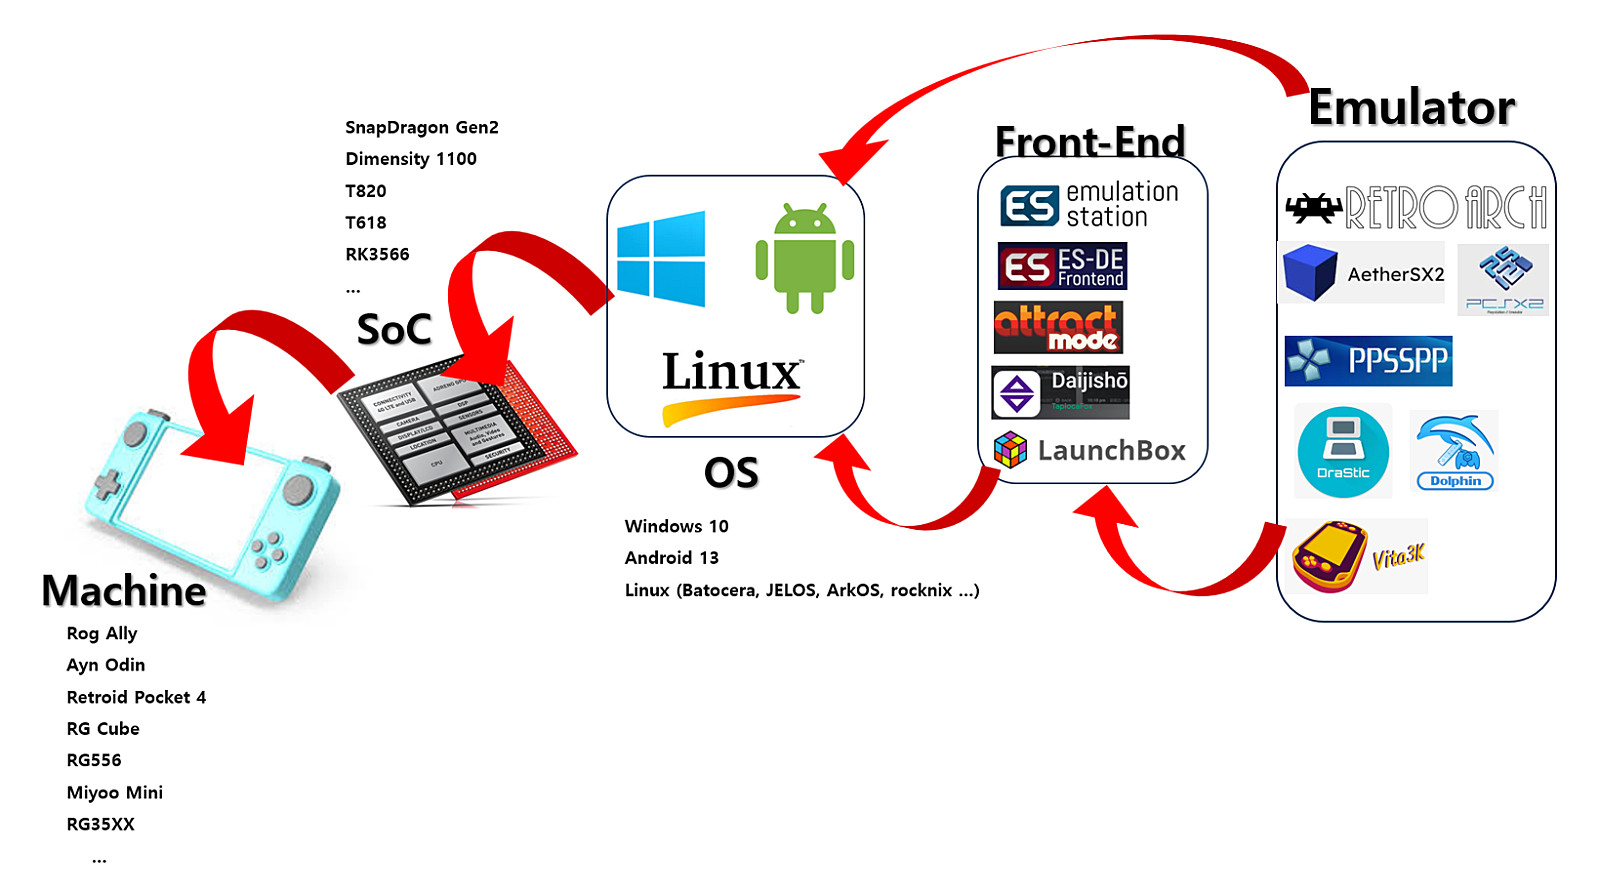
보통 기기에 따라 SoC가 정해지고 → SoC에 따라 OS가 어느 정도 정해지며(칩에 따라 2가지 OS 호환도) → 각 OS마다 실행 가능한 프론트엔드와 에뮬레이터가 있습니다.

Machine → SoC → OS → Front-End → Emulator 구성 Machine → SoC → OS → Front-End → Emulator

성능은 "흉내 내는 게임기"에 비례한다

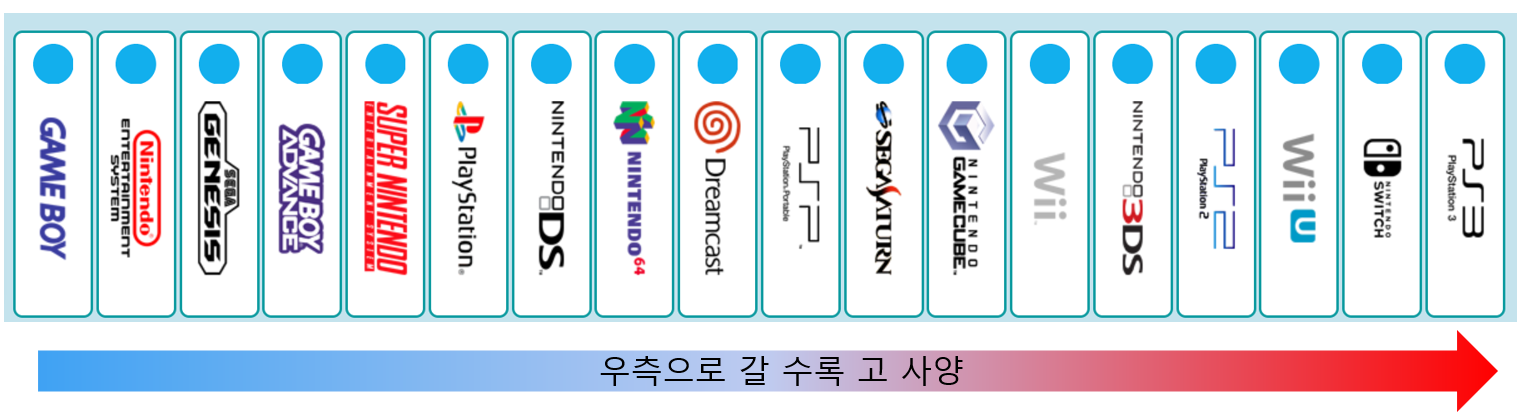
에뮬레이터의 권장 사양은 에뮬레이션하는 콘솔의 성능에 대체로 비례합니다. 패미컴을 흉내 내는 에뮬은 낮은 성능 칩으로도 돌지만, PS2급을 구동하려면 성능 좋은 칩이 필요한 식이죠.

콘솔 성능 스케일 콘솔 성능 스케일 — 우측으로 갈수록 고사양
물론 예외도 있습니다. 에뮬 개발 성숙도나 에뮬레이션 난이도에 따라, 더 낮은 콘솔인데 요구 사양은 더 높은 경우죠. 대표적인 게 새턴(Saturn) — 드림캐스트보다 오히려 더 높은 칩을 요구하기도 합니다.

"어떤 게임기를 살까?"

초보자가 레트로 에뮬 세계에 들어오며 가장 먼저 하는 고민이 바로 이거 아닐까요? 지금은 핸드헬드가 너무 많이 나와 정신이 없을 정도입니다. 딱 5년 전만 해도 선택지가 좁았죠. 당시 인기 기기는 RG350, GKD350H — 대략 PS1을 겨우 돌리는 정도였고, 더 높은 성능이 필요하면 안드로이드 폰에 게임패드를 물리거나 GPD WIN2 같은 UMPC를 샀습니다. 지금은 수십 종의 기기가 있고, 특히 안드로이드 기반이 약간 대세가 되어가는 분위기죠.

OS는 크게 3가지

기기는 수십 종이라도, 쓰이는 OS는 크게 Windows · Android · 커스텀 리눅스 셋으로 나뉩니다. (안드로이드/윈도우가 아니면 다 커스텀 리눅스라고 보면 됩니다.)

OS · 01

🪟 Windows

가장 많은 에뮬 + PC 게임까지, 게임엔 가장 강력

성능 최강 · 화면 큼 (UMPC: ROG Ally·Legion Go·GPD WIN4·AYANEO Flip)

가격·무게·배터리 단점

SoC는 주로 AMD(8840u·z1 extreme). ARM 윈도우는 호환성 주의

OS · 02

🤖 Android

윈도우 다음으로 에뮬이 풍부 · 스트리밍 · winlator로 일부 윈도우 게임

무게·배터리·슬립 밸런스 최고 — 개인적 최애 (중간 포지션)

인풋랙이 약간 있음 (타이밍 게임 민감 시 거슬림)

칩: Snapdragon G3x Gen, Dimensity 1100, T820/T618, Helio-G99 (쿨링=쓰로틀링 주의)

OS · 03

🐧 커스텀 리눅스

가성비 최고 · 안드로이드보다 짧은 인풋랙 · 가벼움

OnionOS·ArkOS·Batocera·JELOS·rocknix·AmberELEC·emuELEC

낯선 리눅스 · OS가 불완전한 경우 → 업데이트 챙기기

칩: rk(락칩) 다수. 다른 FE/에뮬 추가 설치는 일반 유저엔 어려움

조금 더 풀어보면 — Windows는 역사적으로 콘솔 에뮬 개발이 가장 먼저 시작돼 성숙도에서 따라올 OS가 없습니다. Android도 리눅스 커널 기반이지만 구글이 다양한 기기·기술을 통합해 사실상 별개의 OS로 봅니다. 커스텀 리눅스는 우리가 흔히 사는 중국산(안드 아닌) 게임기들이 쓰는 OS로, 보통 프론트엔드·에뮬레이터가 OS 설치 시 함께 포함돼 있습니다.

커스텀 리눅스는 대부분 EmulationStation 계열을 써서, 몇 번 해보면 게임 넣는 방법이 그리 어렵지 않습니다. 다만 정해진 프론트엔드 규칙대로 넣어야 하죠. 내 기기가 어떤 OS를 쓸 수 있는지 검색해 보고, 보통 최신 버전을(가끔 구버전이 나을 때도 — 검색 필수) 쓰는 걸 추천합니다. 예: Miyoo Mini → OnionOS, RGB30 → ArkOS. 참고로 안드로이드 칩 일부는 리눅스도 지원해서, 스냅드래곤 865를 쓰면서 리눅스도 된다는 레트로이드 포켓 5가 큰 관심을 받고 있습니다.

그래서, 다시 "세팅"

기기를 고르고 OS를 올렸다면, 이제 1부에서 말한 그 "세팅" — 게임 롬과 이미지·설명 정보를 일일이 매핑해 나만의 멋진 장식장을 꾸미는 일 — 이 남습니다. 알팩 하나하나를 케이스에 포장하고 매뉴얼까지 넣는, 시간과 정성이 드는 그 작업 말이죠.

★ 그래서 만들었습니다

그 고된 "세팅"을 자동으로

HAE-BANG Rom Setting Tools는 AI 매칭으로 롬을 알아보고, 이미지·영상·매뉴얼을 모아 멋진 장식장을 만들어 ES-DE·RetroArch·Pegasus와 휴대용 게임기로 그대로 보내줍니다.

HAE-BANG 둘러보기 →

PART 3 — Choosing a Device · SoC · OS

If you've read through Part 2, you've got a rough grasp of front-ends, emulators, and RetroArch caught somewhere in between. Now, looking at the handheld you actually hold — together with its SoC (System-on-Chip — CPU, GPU and more on one chip) and its OS — makes the handheld emulation world much clearer.

Complicated? Haha. But it's not that hard. Simple example: say you buy a PC and install the PSP emulator PPSSPP. Then — Machine = PC, SoC = Intel/AMD, OS = Windows, Front-End = none, Emulator = PPSSPP is what you're using.

Generally, the device determines the SoC → the SoC roughly determines the OS (some chips support two OSes) → and each OS has its runnable front-ends and emulators.

Machine → SoC → OS → Front-End → Emulator Machine → SoC → OS → Front-End → Emulator

Performance scales with the "console you imitate"

An emulator's recommended specs roughly scale with the performance of the console it emulates. An emulator imitating a Famicom runs on a low-end chip, while running something like a PS2 needs a powerful chip.

Console performance scale Console performance scale — higher spec toward the right
There are exceptions, of course. Depending on the emulator's maturity and emulation difficulty, a lower console can demand higher specs. A classic example is the Saturn — it can require an even higher chip than the Dreamcast.

"Which device should I buy?"

Isn't this the very first worry for beginners entering retro emulation? There are so many handhelds now it's dizzying. Just five years ago the choices were narrow. The popular devices then were the RG350 and GKD350H — barely able to run PS1. For more power, people hooked a gamepad to an Android phone or bought a UMPC like the GPD WIN2. Now there are dozens of devices, and Android-based ones are becoming somewhat mainstream.

Three main OS categories

Even with dozens of devices, the OSes split into three big groups: Windows · Android · Custom Linux. (If it's not Android or Windows, consider it custom Linux.)

OS · 01

🪟 Windows

Most emulators + PC games too — strongest for gaming

Top performance · big screen (UMPC: ROG Ally · Legion Go · GPD WIN4 · AYANEO Flip)

Downsides: price, weight, battery

SoC mostly AMD (8840u · z1 extreme). ARM Windows: watch compatibility

OS · 02

🤖 Android

Richest emulators after Windows · streaming · some Windows games via winlator

Best balance of weight/battery/sleep — my personal favorite (the middle ground)

Slight input lag (bothersome for timing-sensitive games)

Chips: Snapdragon G3x Gen, Dimensity 1100, T820/T618, Helio-G99 (cooling = watch throttling)

OS · 03

🐧 Custom Linux

Best value · shorter input lag than Android · lightweight

OnionOS · ArkOS · Batocera · JELOS · rocknix · AmberELEC · emuELEC

Unfamiliar Linux · sometimes incomplete OS → keep up with updates

Chips: mostly rk (Rockchip). Adding other FE/emus is hard for average users

A bit more detail — Windows historically had console emulation development start earliest, so no OS matches its maturity. Android is also Linux-kernel-based, but Google integrated so many devices and technologies that it's effectively its own OS. Custom Linux is the OS used by the (non-Android) Chinese handhelds we commonly buy, and usually the front-end and emulators come bundled with the OS install.

Custom Linux mostly uses EmulationStation-family front-ends, so after a few tries, adding games isn't too hard. You just follow the front-end's defined rules. Search which OS your device supports, and generally use the latest version (sometimes an older one is better — search first). e.g., Miyoo Mini → OnionOS, RGB30 → ArkOS. Note that some Android chips also support Linux — the Retroid Pocket 5, which uses a Snapdragon 865 yet reportedly supports Linux, is drawing big interest.

And so — "setup," again

Once you've picked a device and loaded an OS, what remains is that "setup" from Part 1 — mapping each ROM to its images and descriptions to build your own gorgeous cabinet. That time-and-care-intensive job of packing each cartridge into a case and tucking in the manual.

★ So we built it

Automating that grueling "setup"

HAE-BANG Rom Setting Tools recognizes your ROMs with smart matching, gathers images, video and manuals into a beautiful cabinet, and sends it straight to ES-DE, RetroArch, Pegasus and your handhelds.

Explore HAE-BANG →